About a year and a half ago, I shared my idea for a DIY customizable game board made from butcher paper and clear contact paper.
Well, that board, or rather roll, has been kicking around the game closet for a long time and is rather the worse for wear. We've used it any number of times, but it's always a challenge to get it to lay flat on the table.
A few weeks ago I saw some teens in a cafeteria break out an obviously home made game, and I realized they'd simply taken a commercial game board and covered it with white paper. Brilliant!
I've had my eyes open for a cheap game to buy for this purpose ever since, but when the most recent garage sale netted me a copy of Sequence for Kids, it turned out that we love playing it!
I then realized that there's no need to sacrifice the commercial game: the back side of the board can be used without harming the front.
Here's how I made my reusable board, and the first game we played on it.
Materials:
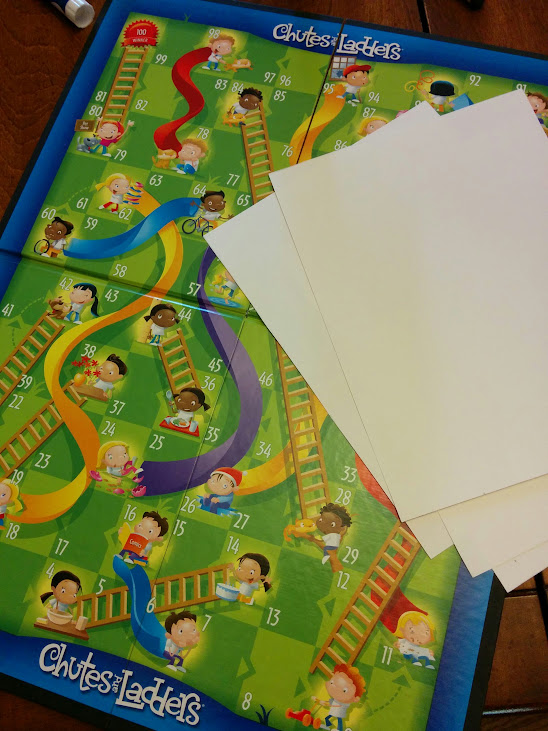
2. Paper to cover back (or front) side of game board. My board had four panels each smaller than 8.5x11, so I used heavy card stock. Butcher paper would be a good alternative for a larger board.
3. Glue / Glue sticks
4. Clear contact paper. Alternately, 8.5x11 laminator.
(OR, use White contact paper and skip the whole annoying paper bit!)
5. Standard felt-tip markers and pencil
6. Dry erase markers
Procedure:

I measured the panels and cut four sheets of white card stock to size.
2. Even though I really hate glue, it was my only sensible option for adhering said paper to my game board. I went with glue sticks to avoid any bubbling or seepage.
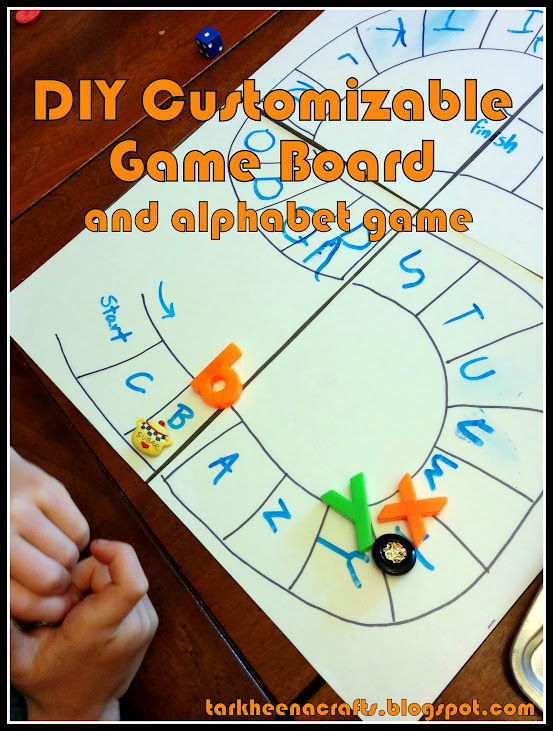
3. I then used my pencil and markers to create a basic game path on to the board. I did not get very scientific about it. I made a basic attempt to avoid having cells span the folds in the game board, but that was it.
4. I cut contact paper to the size of the entire game board and applied it.
That's it! We were ready to create a game! We came up with
Uppercase Lowercase Match

Amazingly, her attention held through writing all 26 letters in the cells (she still needs quite a bit of coaching on letter formation, but she's willing to stick with it!)
However, once that project was done, so was she. She had no interest in playing! This also is typical: her older brother is the competitive one.
So 6-year-old James joined me for the game itself.
Grace's letters were capital; I pulled out a set of magnetic lowercase letters and stuck them to a handy cookie sheet. We rolled a die to advance our counter, and when we landed on an unoccupied square we found the matching lower case letter, covered that square, and then got to advance the counter one more space. If you landed in a square that had already been covered with its matching letter, we just stayed put. The first one to the end (thankfully, James!) won.
Here are some additional ideas for games to create on your new game board. These are for slightly younger kids, 3 to 5 years old.
Ideas for Improvement
As I mentioned after creating out first contact-paper laminated board game, clear contact paper is not a perfect dry-erase surface. Even alcohol fails to remove all of the ink and things get a bit smeary. It's good enough, but it's not great.If I make another game board, I will probably use my laminator on my game board segments rather than the contact paper. That would require a bit more precision in cutting the pieces to size, especially since you need to leave a little margin between the edge of the paper and the edge of the lamination sheet, but it would yield a better dry erase surface. I am concerned that the added bulk (or perhaps the rigidity) may also complicate folding the board - especially if you're using the back.
Of course, an obvious improvement to the clear contact and white paper method is simply to use white contact paper. I didn't have any. This would have the benefit of eliminating the black lines running through the game where the board bends. If I come across a small roll dirt cheap (I.e. at the Dollar Tree!) I may give it a try.
https://lh3.googleusercontent.com/rGHx0c3EehazBzrIRSZOYOI1WR45Iu9QuWbRnwXIjPUI=w549-h731-no


No comments:
Post a Comment